How to Delete Old Data from an Azure Storage Table: Part 2

In part 1 of this series, we explored how to delete data from an Azure Storage Table and covered the simple implementation of the AzureTablePurger tool.

The simple implementation seemed way too slow to me, and took a long time when purging a large amount of data from a table. I figured if I could execute many requests to Table Storage in parallel, it should perform a lot quicker.

To recap, our code fundamentally does 2 things:

  1. Enumerates entities to be deleted

  2. Delete entities using batch operations on Azure Table Storage

Since there could be a lot of data to enumerate and delete, there is no reason why we can't execute these operations parallel.

Since the AzureTablePurger is implemented as a console app, we could parallelize the operation by spinning up multiple threads, or multiple Tasks, or using the Task Parallel Library to name a few ways. The latter is the preferred way to build such a system in .NET 4 and beyond as it simplifies a lot of the underlying complexity of building multi-threaded and parallel applications.

I settled on using the Producer/Consumer pattern backed by the Task Parallel Library.

Producer/Consumer Pattern

Put simply, the Producer/Consumer pattern is where you have 1 thing producing work and putting it in a queue, and another thing taking work items from that queue and actually doing the work.

There is a pretty straightforward way to implement this using the BlockingCollection in .NET.

Producer

In our case, the Producer is the thing that is querying Azure Table Storage and queuing up work:

/// <summary>
/// Data collection step (ie producer).
///
/// Collects data to process, caches it locally on disk and adds to the _partitionKeyQueue collection for the consumer
/// </summary>
private void CollectDataToProcess(int purgeRecordsOlderThanDays)
{
    var query = PartitionKeyHandler.GetTableQuery(purgeRecordsOlderThanDays);
    var continuationToken = new TableContinuationToken();

    try
    {
        // Collect data
        do
        {
            var page = TableReference.ExecuteQuerySegmented(query, continuationToken);
            var firstResultTimestamp = PartitionKeyHandler.ConvertPartitionKeyToDateTime(page.Results.First().PartitionKey);

            WriteStartingToProcessPage(page, firstResultTimestamp);

            PartitionPageAndQueueForProcessing(page.Results);

            continuationToken = page.ContinuationToken;
            // TODO: temp for testing
            // continuationToken = null;
        } while (continuationToken != null);

    }
    finally
    {
        _partitionKeyQueue.CompleteAdding();
    }
}

We start by executing a query against Azure Table storage. Like with our simple implementation, this will execute a query and obtain a page of results, with a maximum of 1000 entities. We then take the page of data and break it up into chunks for processing.

Remember, to delete entities in Table Storage, we need the PartitionKey and RowKey. Since we could be dealing with a large amount of data, it doesn't make sense to store this PartitionKey and RowKey information in memory, otherwise we'll start running out of space. Instead, I decided to cache this on disk in one file for each PartitionKey. Inside the file, we write one line for each PartitionKey + RowKey combination that we want to delete.

We also add a work item to an in-memory queue that our consumer will pull from. Here’s the code:

/// <summary>
/// Partitions up a page of data, caches locally to a temp file and adds into 2 in-memory data structures:
///
/// _partitionKeyQueue which is the queue that the consumer pulls from
///
/// _partitionKeysAlreadyQueued keeps track of what we have already queued. We need this to handle situations where
/// data in a single partition spans multiple pages. After we process a given partition as part of a page of results,
/// we write the entity keys to a temp file and queue that PartitionKey for processing. It's possible that the next page
/// of data we get will have more data for the previous partition, so we open the file we just created and write more data
/// into it. At this point we don't want to re-queue that same PartitionKey for processing, since it's already queued up.
/// </summary>
private void PartitionPageAndQueueForProcessing(List<DynamicTableEntity> pageResults)
{
    _cancellationTokenSource.Token.ThrowIfCancellationRequested();

    var partitionsFromPage = GetPartitionsFromPage(pageResults);

    foreach (var partition in partitionsFromPage)
    {
        var partitionKey = partition.First().PartitionKey;

        using (var streamWriter = GetStreamWriterForPartitionTempFile(partitionKey))
        {
            foreach (var entity in partition)
            {
                var lineToWrite = $"";

                streamWriter.WriteLine(lineToWrite);
                Interlocked.Increment(ref _globalEntityCounter);
            }
        }

        if (!_partitionKeysAlreadyQueued.Contains(partitionKey))
        {
            _partitionKeysAlreadyQueued.Add(partitionKey);
            _partitionKeyQueue.Add(partitionKey);

            Interlocked.Increment(ref _globalPartitionCounter);
            WriteProgressItemQueued();
        }
    }
}

A couple of other interesting things here:

  • The queue we're using is actually a BlockingCollection, which is an in-memory data structure that implements the Producer/Consumer pattern. When we put things in here, the Consumer side, which we’ll explore below, takes them out

  • It's possible (and in fact likely) that we'll run into situations where data having the same PartitionKey ends up spanning multiple pages of results. For example, at the end of page 5, we have 30 records with PartitionKey = 0636213283200000000, and at the beginning of page 6, we have a further 12 records with the same PartitionKey. To handle this situation, when processing page 5, we create a file 0636213283200000000.txt to cache all of the PartitionKey + RowKey combinations and add 0636213283200000000 to our queue for processing. When we process page 6, we realize we already have a cache file 0636213283200000000.txt, so we simply append to the file it. Since we have already added 0636213283200000000 to our queue for processing. We don’t want to have duplicate items in the queue, otherwise we'd end up with multiple consumers each trying to consume or process the same cache file, which doesn't make sense. Since there isn't a built-in way to prevent us from adding duplicates into a BlockingCollection, the easiest option is to simply maintain a parallel data structure (in this case a HashSet) so we can keep track of and quickly query items we've added into the queue to ensure we're not going to add the same PartitionKey into the queue twice

  • We're using Interlocked.Increment() to increment some global variables. This ensures that when we're running multi-threaded, each thread can reliably increment the counter without running into any threading issues. If you're wondering why to use Interlocked.Increment() vs lock or volatile, there is a great discussion on the matter on this Stack Overflow post.

Consumer

The consumer in this implementation is responsible for actually deleting the entities we want to delete. It is given the PartitionKey that it should be dealing with, reads the cached PartitionKey + RowKey combination from disk, and constructs batches of no more than 100 operations at a time and executes them against the Table Storage API:

/// <summary>
/// Process a specific partition.
///
/// Reads all entity keys from temp file on disk
/// </summary>
private void ProcessPartition(string partitionKeyForPartition)
{
    try
    {
        var allDataFromFile = GetDataFromPartitionTempFile(partitionKeyForPartition);

        var batchOperation = new TableBatchOperation();

        for (var index = 0; index < allDataFromFile.Length; index++)
        {
            var line = allDataFromFile[index];
            var indexOfComma = line.IndexOf(',');
            var indexOfRowKeyStart = indexOfComma + 1;
            var partitionKeyForEntity = line.Substring(0, indexOfComma);
            var rowKeyForEntity = line.Substring(indexOfRowKeyStart, line.Length - indexOfRowKeyStart);

            var entity = new DynamicTableEntity(partitionKeyForEntity, rowKeyForEntity) { ETag = "*" };

            batchOperation.Delete(entity);

            if (index % 100 == 0)
            {
                TableReference.ExecuteBatch(batchOperation);
                batchOperation = new TableBatchOperation();
            }
        }

        if (batchOperation.Count > 0)
        {
            TableReference.ExecuteBatch(batchOperation);
        }

        DeletePartitionTempFile(partitionKeyForPartition);
        _partitionKeysAlreadyQueued.Remove(partitionKeyForPartition);

        WriteProgressItemProcessed();
    }
    catch (Exception)
    {
        ConsoleHelper.WriteWithColor($"Error processing partition ", ConsoleColor.Red);
        _cancellationTokenSource.Cancel();
        throw;
    }
}

After we finish processing a partition, we remove the temp file and we remove the PartitionKey from our data structure that is keeping track of the items in the queue, namely the HashSet _partitionKeysAlreadyQueued. There is no need to remove the PartitionKey from the queue, as that already happened when this method was handed the PartitionKey.

Note:

  • This implementation is reading all of the cached data into memory at once, which is fine for the data patters I was dealing with, but we could improve this by doing a streamed read of the data to avoid reading too much information into memory


Executing both in Parallel

To string both of these together and execute them in Parallel, here's what we do:

public override void PurgeEntities(out int numEntitiesProcessed, out int numPartitionsProcessed)
{
    void CollectData()
    void ProcessData()
    {
        Parallel.ForEach(_partitionKeyQueue.GetConsumingPartitioner(), new ParallelOptions { MaxDegreeOfParallelism = MaxParallelOperations }, ProcessPartition);
    }

    _cancellationTokenSource = new CancellationTokenSource();

    Parallel.Invoke(new ParallelOptions { CancellationToken = _cancellationTokenSource.Token }, CollectData, ProcessData);

    numPartitionsProcessed = _globalPartitionCounter;
    numEntitiesProcessed = _globalEntityCounter;
}

Here we're defining 2 Local Functions, CollectData() and ProcessData(). CollectData will serially execute our Producer step and put work items in a queue. ProcessData will, in parallel, consume this data from the queue.

We then invoke both of these steps in parallel using Parallel.Invoke() which will wait for them to complete. They'll be deemed completed when the Producer has declared there is no more things it is planning to add via:

_partitionKeyQueue.CompleteAdding();

and the Consumer has finished draining the queue.

Performance

Now we're doing this in parallel, it should be quicker, right?

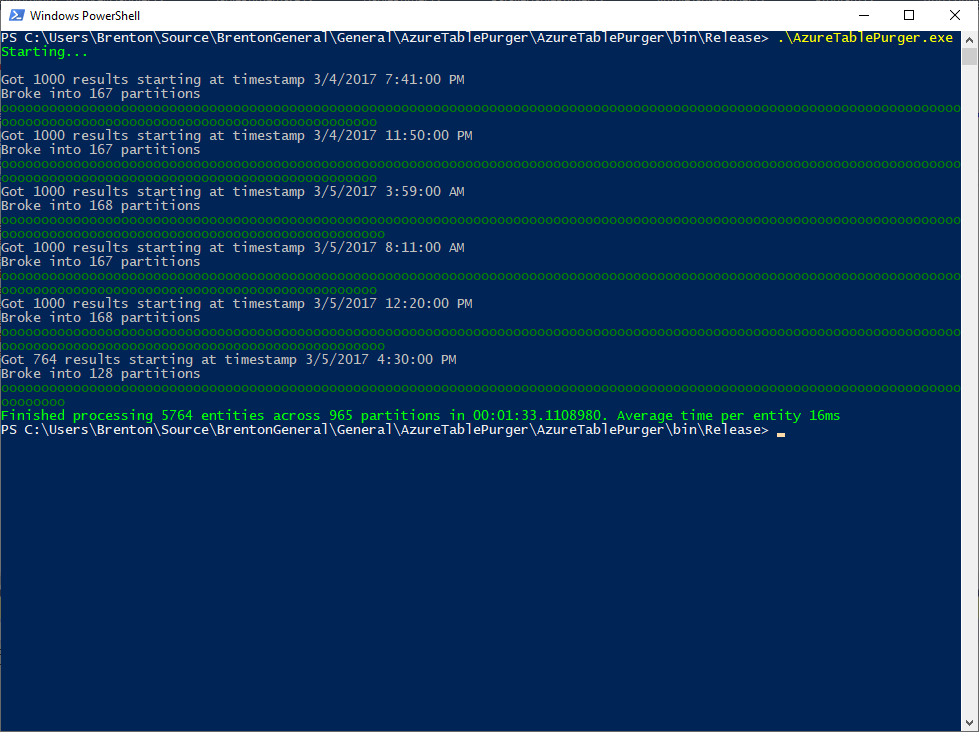
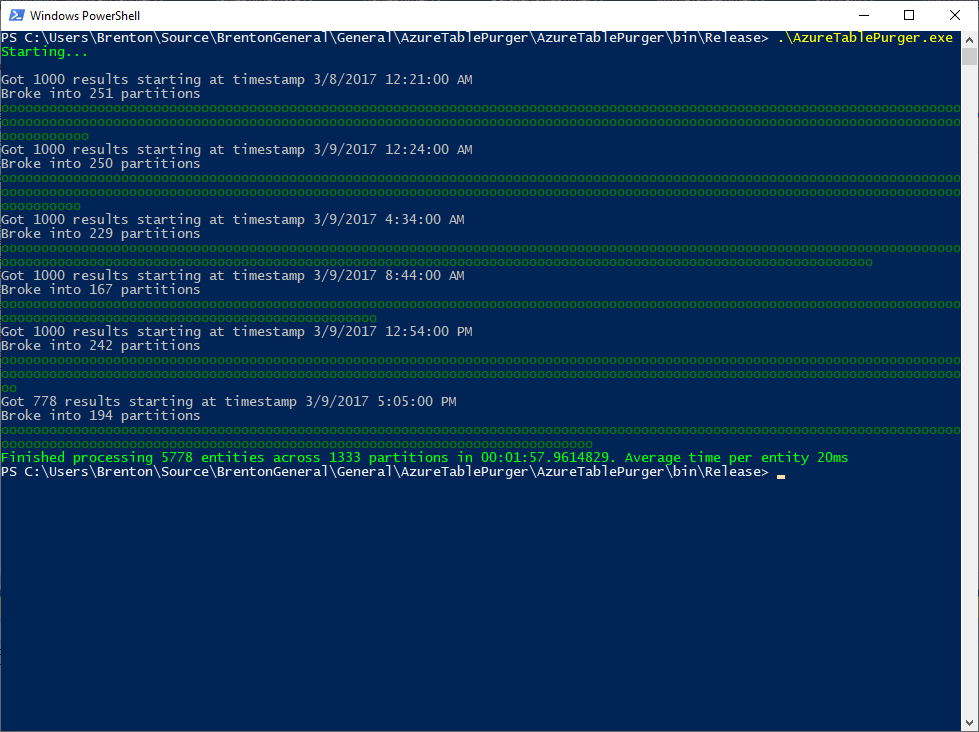
In theory, yes, but initially, this was not the case:

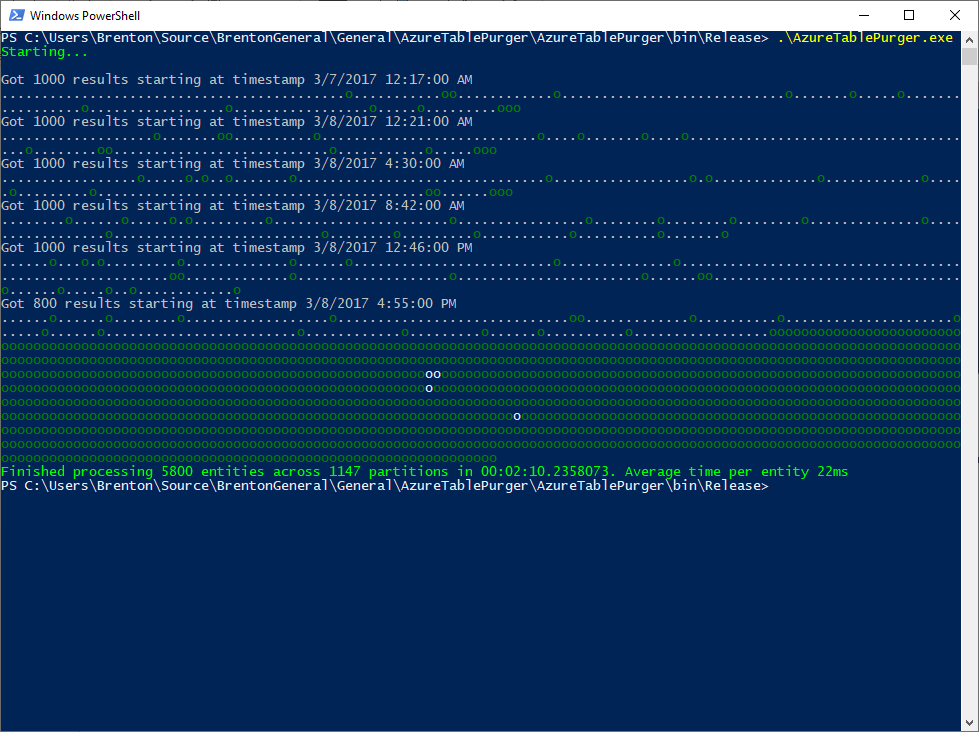
From the 2 runs above you can visually see how the behavior differs from the Simple implementation: each "." represents a queued work item, and each "o" represents a consumed work item. We're producing the work items much quicker than we can consume them (which is expected), and once our production of work items is complete, then we are strictly consuming them (also expected).

What was not expected was the timing. It's taking approximately the same time on average to delete an entity using this parallel implementation as it did with the simple implementation, so what gives?

Turns out I had forgotten an important detail - adjusting the number of network connections available by using the ServicePointManager.DefaultConnectionLimit property. By default, a console app is only allowed to have a maximum of 2 concurrent connections to a given host. In this app, the producer is typing up a connection while it is hitting the API and obtaining PartitionKeys + RowKeys of entities we want to delete. There should be many consumers running at once sending deletion requests to the API, but there is only 1 connection available for them to share. Once all of the production is complete, then we'd free up that connection and now have 2 connections available for consumers. Either way, we're seriously limiting our throughput here and defeating the purpose of our much fancier and more complicated Parallel solution which should be quicker, but instead is running at around the same pace as the Simple version.

I made this change to rectify the problem:

private const int ConnectionLimit = 32;

public ParallelTablePurger()
{
    ServicePointManager.DefaultConnectionLimit = ConnectionLimit;
}

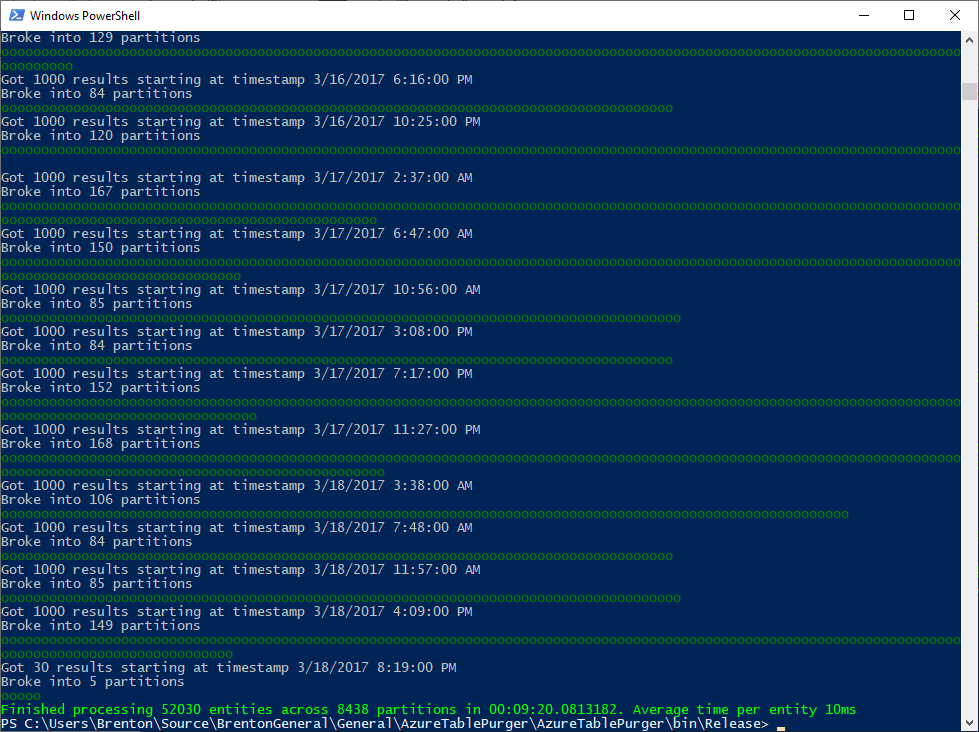
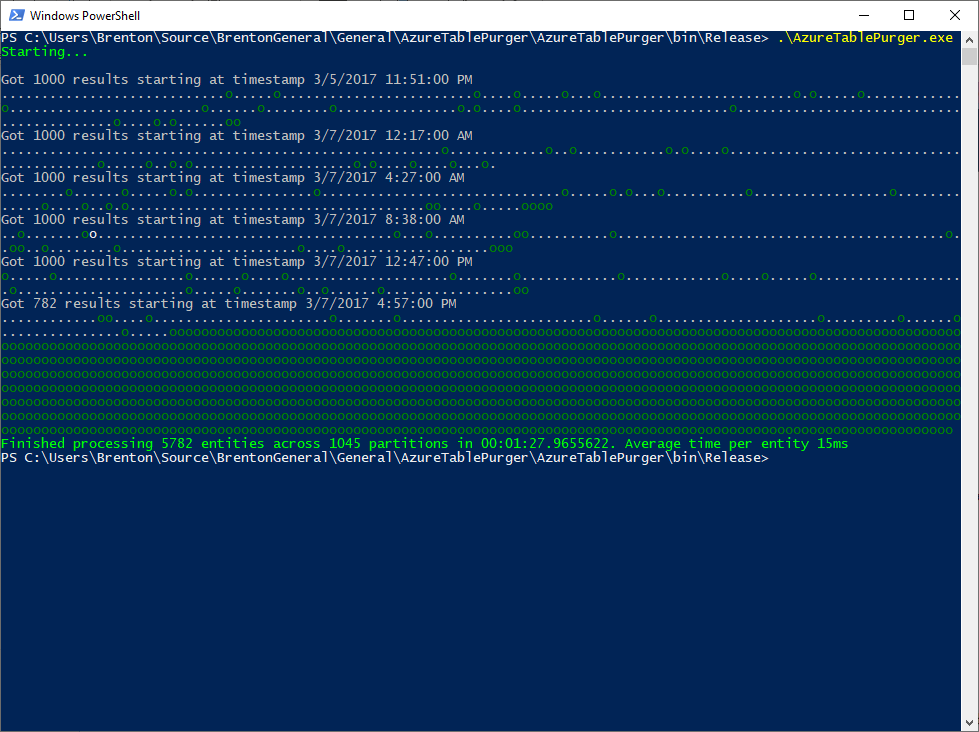
Now, we're allowing up to 32 connections to the host. With this I saw the average execution time drop to around 5-10ms, so somewhere between 2-4x the speed of the simple implementation.

I also tried 128 and 256 maximum connections, but that actually had a negative effect. My machine was a lot less responsive while the app was running, and average deletion times per entity were in the 10-12ms range. 32 seemed to be somewhere around the sweet spot.

For the future: turning it up to 11

There are many things that can be improved here, but for now, this is good enough for what I need.

However, if we really wanted to turn this up to 11 and make it a lot quicker, a lot more efficient and something that just ran constantly as part of our infrastructure to purge old data from Azure tables, we could re-build this to run in the cloud.

For example, we could create 2 separate functions: 1 to enumerate the work, and a second one that will scale out to execute the delete commands:

1. Create an Azure Function to enumerate the work

As we query the Table Storage API to enumerate the work to be done, put the resulting PartitionKey + RowKey combination either into a text file on blob storage (similar to this current implementation), or consider putting it into Cosmos DB or Redis. Redis would probably be the quickest, and Blob Storage probably the cheapest, and has the advantage that we avoid having to spin up additional resources.

Note, if we were to deploy this Azure Function to a consumption plan, functions have a timeout of 10 minutes. We'd need to make sure that we either limit our run to less than 10 minutes in duration, or we can handle being interrupted part way through and pick up where we left the next time the function runtime calls our functio

2. Create an Azure Function to do the deletions

After picking up an item from the queue, this function would be responsible for reading the cached PartitionKey + RowKey and batching up delete operations to send to Table Storage. If we deployed this as an Azure Function on a consumption plan, it will scale out to a maximum of 200 instances, which should be plenty for us to work through the queue of delete requests in a timely manner, and so long as we're not exceeding 20,000 requests per second to the storage account, we won't hit any throttling limits there.

Async I/O

Something else we'd look to do is to make the I/O operations asynchronous. This would probably provide some benefits in our console app implementation, although I'm not sure how much difference it would really make. I decided against async I/O for the initial implementation, since it doesn't play well with Parallel.ForEach (check out this Stack Overflow post or this GitHub issue for some more background), and would require a more complex implementation to work.

With a move to the cloud and Azure Functions, I'm not sure how much benefit async I/O would have either, since we rely heavily on scaling out the work to different processes and machines via Azure Functions. Async is great for increasing throughput and scalability, but not raw performance, which is what our goal is here.

Side Note: Durable Functions

Something else which is pretty cool and could be useful here is Azure Durable functions. This could be an interesting solution to this problem as well, especially if we wanted to report back on aggregate statistics like how long it took to complete all of the work and average time to delete a specific record (ie the fan-in).

Conclusion

It turns out the Parallel solution is quicker than the Simple solution. Feel free to use this tool for your own purposes, or if you’re interested in improving it, go ahead and fork it and make a pull request. There is a lot more that can be done :)

How to Delete Old Data From an Azure Storage Table : Part 1

Have you ever tried to purge old data from an Azure table? For example, let's say you're using the table for logging, like the Azure Diagnostics Trace Listener which logs to the WADLogsTable, and you want to purge old log entries.

 There is a suggestion on Azure feedback for this feature, questions on Stack Overflow (here's one and another), questions on MSDN Forums and bugs on Github.

 There are numerous good articles that cover deletion of entities from Azure Tables.

 However, no tools are available to help.


UPDATE: I’m creating a SaaS tool that will automatically delete data from your Azure tables older than X days so you don’t need to worry about building this yourself. Interested? Sign up for the beta (limited spots available):


TL;DR: while the building blocks exist in the Azure Table storage APIs to delete entities, there are no native ways to easily bulk delete data, and no easy way to purge data older than a certain number of days. Nuking the entire table is certainly the easiest way to go, so designing your system to roll to a new table every X days or month or whatever (for example Logs201907, Logs201908 for logs generated in July 2019 and August 2019 respectively) would be my recommendation.

If that ship has sailed and you stuck in a situation where you want to purge old data from a table, like I was, I created a tool to make my life, and hopefully your life as well, a bit easier.

 The code is available here: https://github.com/brentonw/AzureTablePurger

Disclaimer: this is prototype code, I've run this successfully myself and put it through a bunch of functional tests, but at present, it doesn’t have a set of unit tests. Use at your own risk :)

How it Works

Fundamentally, this tool has 2 steps:

  1. Enumerates entities to be deleted

  2. Delete entities using batch operations on Azure Table Storage

I started off building a simple version which synchronously grabs a page of query results from the API, then breaks that page into batches of no more than 100 items, grouped by PartitionKey - a requirement for the Azure Table Storage Batch Operation API, then execute batch delete operations on Azure Table Storage.

Enumerating Which Data to Delete

Depending on your PartitionKey and RowKey structure, this might be relatively easy and efficient, or it might be painful. With Azure Table Storage, you can only query efficiently when using PartitionKey or a PartitionKey + RowKey combination. Anything else results in a full table scan which is inefficient and time consuming. There is tons of background on this in the Azure docs: Azure Storage Table Design Guide: Designing Scalable and Performant Tables.

Querying on the Timestamp column is not efficient, and will require a full table scan.

If we take a look at the WADLogsTable, we'll see data similar to this:


PartitionKey = 0636213283200000000
RowKey = e046cc84a5d04f3b96532ebfef4ef918___Shindigg.Azure.BackgroundWorker___Shindigg.Azure.BackgroundWorker_IN_0___0000000001652031489


Here's how the format breaks down:

PartitionKey = "0" + the minute of the number of ticks since 12:00:00 midnight, January 1, 0001

RowKey = this is the deployment ID + the name of the role + the name of the role instance + a unique identifier


Every log entry within a particular minute is bucketed into the same partition which has 2 key advantages:

  1. We can now effectively query on time

  2. Each partition shouldn't have too many records in there, since there shouldn't be that many log entries within a single minute

Here's the query we construct to enumerate the data:

public TableQuery GetTableQuery(int purgeEntitiesOlderThanDays)
{
    var maximumPartitionKeyToDelete = GetMaximumPartitionKeyToDelete(purgeEntitiesOlderThanDays);

    var query = new TableQuery()
        .Where(TableQuery.GenerateFilterCondition("PartitionKey", QueryComparisons.LessThanOrEqual, maximumPartitionKeyToDelete))
        .Select(new[] { "PartitionKey", "RowKey" });

    return query;
}

private string GetMaximumPartitionKeyToDelete(int purgeRecordsOlderThanDays)
{
    return DateTime.UtcNow.AddDays(-1 * purgeRecordsOlderThanDays).Ticks.ToString("D19");
}

The execution of the query is pretty straightforward:

var page = TableReference.ExecuteQuerySegmented(query, continuationToken);

The Azure Table Storage API limits us to 1000 records at a time. If there are more than 1000 results, the continuationToken will be set to a non-null value, which will indicate we need to make the query again with that particular continuationToken to get the next page of data from the query.

Deleting the Data

In order to make this as efficient as possible and minimize the number of delete calls we make to the Auzre Table Storage API, we want to batch things up as much as possible.

Azure Table Storage supports batch operations, but there are two caveats we need to be aware of (1) all entities must be in the same partition and (2) there can be no more than 100 items in a batch.

To achieve this, we're going to break our page of data into chunks of no more than 100 entities, grouped by PartitionKey:

protected IList<IList<DynamicTableEntity>> GetPartitionsFromPage(IList<DynamicTableEntity> page)
{
    var result = new List<IList<DynamicTableEntity>>();

    var groupByResult = page.GroupBy(x => x.PartitionKey);

    foreach (var partition in groupByResult.ToList())
    {
        var partitionAsList = partition.ToList();
        if (partitionAsList.Count > MaxBatchSize)
        {
            var chunkedPartitions = Chunk(partition, MaxBatchSize);
            foreach (var smallerPartition in chunkedPartitions)
            {
                result.Add(smallerPartition.ToList());
            }
        }
        else
        {
            result.Add(partitionAsList);
        }
    }

    return result;
}

Then, we'll iterate over each partition, construct a batch operation and execute it against the table:

foreach (var entity in partition)
{
    Trace.WriteLine(
        $"Adding entity to batch: PartitionKey=, RowKey=");
    entityCounter++;

    batchOperation.Delete(entity);
    batchCounter++;
}

Trace.WriteLine($"Added  items into batch");

partitionCounter++;

Trace.WriteLine($"Executing batch delete of  entities");
TableReference.ExecuteBatch(batchOperation);

Here's the entire processing logic:

public override void PurgeEntities(out int numEntitiesProcessed, out int numPartitionsProcessed)
{
    VerifyIsInitialized();

    var query = PartitionKeyHandler.GetTableQuery(PurgeEntitiesOlderThanDays);

    var continuationToken = new TableContinuationToken();

    int partitionCounter = 0;
    int entityCounter = 0;

    // Collect and process data
    do
    {
        var page = TableReference.ExecuteQuerySegmented(query, continuationToken);
        var firstResultTimestamp = PartitionKeyHandler.ConvertPartitionKeyToDateTime(page.Results.First().PartitionKey);

        WriteStartingToProcessPage(page, firstResultTimestamp);

        var partitions = GetPartitionsFromPage(page.ToList());

        ConsoleHelper.WriteLineWithColor($"Broke into  partitions", ConsoleColor.Gray);

        foreach (var partition in partitions)
        {
            Trace.WriteLine($"Processing partition ");

            var batchOperation = new TableBatchOperation();
            int batchCounter = 0;

            foreach (var entity in partition)
            {
                Trace.WriteLine(
                    $"Adding entity to batch: PartitionKey=, RowKey=");
                entityCounter++;

                batchOperation.Delete(entity);
                batchCounter++;
            }

            Trace.WriteLine($"Added  items into batch");

            partitionCounter++;

            Trace.WriteLine($"Executing batch delete of  entities");
            TableReference.ExecuteBatch(batchOperation);

            WriteProgressItemProcessed();
        }

        continuationToken = page.ContinuationToken;

    } while (continuationToken != null);

    numPartitionsProcessed = partitionCounter;
    numEntitiesProcessed = entityCounter;
}

Performance

I ran this a few times on a subset of data. On average it takes around 10-20ms depending on the execution run to delete each entity:

This seemed kind of slow to me, and when trying to purge a lot of data, it takes many hours to run. I figured I should be able to improve the speed dramatically by turning this into a parallel operation.

Stay tuned for part 2 of this series to dive deeper into the parallel implementation.

Conclusion for Part 1

Since Azure Table Storage has no native way to purge old data, your best best is to structure your data so that you can simply delete old tables when you no longer need them and purge data that way.

However, if you can’t do that, feel free to make use of this AzureTablePurger tool.

Reliability and Resiliency for Cloud Connected Applications

Building cloud connected applications that are reliable is hard. At the heart of building such a system is a solid architecture and focus on resiliency. We're going to explore what that means in this post.

When I first started development on FastBar a cashless payment system for events, there were a few key criteria that drove my decisions for the overall architecture of the system.

Fundamentally, FastBar is a payment system designed specifically for event environments. Instead of using cash or drink tickets or clunky old credit card machines, events use FastBar instead.

There are 2 key characteristics of the environment in which FastBar operates, and the system that provide that drive almost all underlying aspects of the technical architecture: internet connectivity sucks, and we're dealing with people's money.

Internet connectivity at an event sucks

Prior to starting FastBar, I had a side business throwing events in Seattle. We'd throw summer parties, Halloween parties, New Year's Eve parties etc… In 10 years of throwing events, I cannot recall a single event where internet worked flawlessly. Most of the time it ranged from "entirely useless" to "ok some of the time".

At an event, there are typically 2 choices for getting internet connectivity:

  1. Rely on the venue's in-house WiFi

  2. Use the cellular network, for example a hotspot

Sometimes the venue's WiFi would work great in an initial walkthrough… and then 2000 people would arrive and connectivity goes to hell. Other times it would work great in certain areas of the venue, then we tested it where we wanted to setup registration, or place a bar, only to get an all too familiar response from the venue's IT folks: "oh, we didn’t think anyone would want internet there".

Relying on hotspots was just a bad: at many indoor locations, connectivity is poor. Even if you're outdoors with great connectivity, add a couple of thousand people to that space, each of them with smartphones hungry for bandwidth so they can post to Facebook/Instagram/Snapchat, or their phone just decides now is a great time to download that latest 3Gb iOS update in the background.

No matter what, internet connectivity at event environments is fundamentally poor and unreliable. This is something that isn't true in a standard retail environment like a coffee shop or hairdresser where you'd deploy a traditional point of sale, and it would have generally reliable internet connectivity.

We're dealing with people's money

For the event, the point of sale system is one of the most critical aspects - it effects attendee's ability to buy stuff, and the events ability to sell stuff. If the point of sale is down, attendees are pissed off and the event is losing money. Nobody wants that.

Food, beverage and merchandise sales are a huge source of revenue for events. For some events, it could be their only source of revenue.

In general, money is a very sensitive topic for people. Attendees have an expectation that they are charged accurately for the things they purchase, and events expect the sales numbers they see on their dashboard are correct, both of which are very reasonable expectations.

Reliability and Resiliency

Like any complicated, distributed software system, there are many non-functional requirements that are important to create something that works. A system needs to be:

  • Available

  • Secure

  • Maintainable

  • Performant

  • Scalable

  • And of course reliable

Ultimately, our customers (the events), and their customers (the attendees), want a system that is reliable and "just works". We achieve that kind of reliability by focusing on resiliency - we expect things will fail, and design a system that will handle those failures.

This means when thinking about our client side mobile apps, we expect the following:

  • Requests we make over the internet to our servers will fail, or will be slow. This could mean we have no internet connectivity at the time and can't event attempt to make a request to the server, or we have internet, but the request failed to get to the server, or the request made it to our server but the client didn't get the response

  • A device may run out of battery in the middle of an operation

  • A user may exit the app in the middle of an operation

  • A user may force close the app in the middle of an operation

  • The local SQLite database could get corrupt

  • Our server environment may be inaccessible

  • 3rd party services our apps communicate with might be inaccessible

On the server side, we run on Azure and also depend on a handful of 3rd party services. While generally reliable, we can expect:

  • Problems connecting to our Web App or API

  • Unexpected CPU spikes on our Azure Web Apps that impact client connectivity and dramatically increase response time for requests

  • Web Apps having problems connecting to our underlying SQL Azure database or storage accounts

  • Requests to our storage account resources being throttled

  • 3rd party services that normally respond in a couple of hundred milliseconds taking 120+ seconds to respond (that one caused a whole bunch of issues that still traumatize me to this day)

We've encountered every single one of these scenarios. Sometimes it seems like almost everything that can fail, has failed at some point, usually at the most inopportune time. That's not quite true, I can mentally create some nightmare scenarios that we could potentially encounter in the future, but these days we're in great shape to withstand multiple critical failures across different parts of our system and still retain the ability to take orders at the event, and have minimal impact to attendees and event staff.

We've done this by focusing on resiliency in all parts of the system - everything from the way we architect to the details of how we make network requests and interact with 3rd party services.

Processing an Order

To illustrate how we achieve resiliency, and therefore reliability, let's take a look at an example of processing and order. Conceptually, it looks like this:

FastBar - Order Processing - Conceptual.png

The order gets created on the POS and makes an API request to send it to the server. Seems pretty easy, right?

Not quite.

Below is a highly summarized version of what actually happens when an order is placed, and how it flows through the system:

There is a lot more to it that just a simple request-response. Instead, it's a complicated series of asynchronous operations and a whole bunch of queues in between which help us provide a system that is reliable and resilient.

On the POS App

  1. The underlying Order object and associated set of OrderItems are created and persisted to our local SQLite database
  2. We create a work item and place it on a queue. In our case, we implement our own queue as a table inside the same SQLite database. Both steps 1 and 2 happen transactionally, so either all inserts succeed, or none succeed. All of this happens within milliseconds, as it's all local on the device and doesn't rely on any network connectivity. The user experience is never impacted in case of network connectivity issues
  3. We call the synchronization engine and ask it to push our changes
    1. If we're online at the time, the synchronization engine will pick up items from the queue that are available for processing, which could be just the 1 order we just created, or there could be many orders that have been queued and are waiting to be sent to the server. For example if we were offline and have just come back online. Each item will be processed in the order that it was placed on the queue, and each item involves its own set of work. In this case, we're attempting to push this order to our server via our server-side API. If the request to the server succeeds, we'll delete the work item from the queue, and update the local Order and OrderItems with some data that the server returns to us in the response. This all happens transactionally.
    2. If there is a failure at any point, for example a network error, or a server error, we'll put that item back on the queue for future processing
    3. If we're not online, the synchronization engine can't do anything, so it returns immediately, and will re-try in the future. This happens either via a timer that is syncing periodically, or after another order is created and a push is requested
    4. Whenever we make any request to the server that could update or create any data, we send a IndempotentOperationKey which the server uses to determine if the request has been processed already or not

The Server API

  1. Our Web API receives the request and processed it
    1. We make sure the user has permissions to perform this operation, and verify that we have not already processed a request with the same IdempotentOperationKey the client has supplied
    2. The incoming request is validated, and if we can, we'll create an Order and set of OrderItems and insert them into the database. At this point, our goal is to do the minimal work possible and leave the bulk of the processing to later
    3. We'll queue a work item for processing in the background

Order Processor WebJob

  1. Our Order Processor is implemented as an Azure WebJob and runs in the background, constantly looking at the queue for new work
  2. The Order Processor is responsible for the core logic when it comes to processing an order, for example, connecting the order to an attendee and their tab, applying any discounts or promotions that may be applicable for that attendee and re-calculating the attendee's tab
  3. Next, we want to notify the attendee of their purchase, typically by sending them an SMS. We queue up a work item to be handled by the Outbound SMS Processor

Outbound SMS Processor WebJob

  1. The Outbound SMS processor handles the composition and sending of SMS messages to our 3rd party service for delivery, in our case, Twilio
  2. We're done!

That's a lot of complexity for what seems like a simple thing. So why would we add all of these different components and queues? Basically, it’s necessary to have a reliable and resilient system that can handle a whole lot of failure and still keep going:

  • If our client has any kind of network issues connecting to the server

  • If our client app is killed in any way, for example, if the device runs out of battery, or if the OS decided to kill our app since we were moved to the background, or if the user force quits our app

  • If our server environment is totally unavailable

  • If our server environment is available but slow to respond, for example, due to cloud weirdness (a whole other topic), or our own inefficient database queries or any number of other reasons

  • If our server environment has transitory errors caused by problems connecting with dependent services, for example, Azure SQL or Azure storage queues returning connectivity errors

  • If our server environment has consistent errors, for example, if we pushed a new build to the server that had a bug in it

  • If 3rd party services we depend on are unavailable for any reason

  • If 3rd party services we depend on are running slow for any reason

Asynchronicity to the Max

You'll notice the above flow is highly asynchronous. Wherever we can queue something up and process it later, we will. This means we're never worried if whatever system we're talking to is operating normally or not. If it's alive and kicking, great, we'll get that work processed quickly. If not, no worries, it will process in the background at some point in the future. Under normal circumstances, you could expect an order to be created on the client and a text message received by the customer within seconds. But, it could take a lot longer if any part of the system is running slowly or down, and that's ok, since it doesn't dramatically affect the user experience, and the reliability of the system is rock solid. .

It's also worth noting that all of these operations are both logically asynchronous, and asynchronous at the code level wherever possible.

Logically asynchronous meaning instead of the POS order creation UI directly calling the server, or, on the server side, the request thread directly calling a 3rd party service to send an SMS, these operations get stored in a queue for later processing in the background. Being logically asynchronous is what gives us reliability and resiliency.

Asynchronous at the code level is different. This means that wherever possible, when we are doing any kind of I/O we utilize C#’s async programming features. It's important to note that underlying code being asynchronous doesn’t actually have anything to do with resiliency. Rather, it helps our components achieve higher throughput since they're not tying up resources like threads, network sockets, database connections, file handles etc… waiting for responses. Asynchronity at the code level is all about throughput and scalability.

Conclusion

When you're building mobile applications connected to the cloud, reliability is key. The way to achieve reliability is by focusing on resiliency. Expect that everything can and probably will fail, and design you system to handle these failures. Make sure your system is highly logically asynchronous and queue up work to be handled by background components wherever possible.

FastBar's Technical Architecture

Previously, I've discussed the start of FastBar, how the client and server technology stacks evolved and what it looks like today (read more in part 1, part 2 and part 3 of that series).

As a recap, here's what the high-level components of FastBar look like:

FastBar Components - High Level.png

Let's dive deeper.

Architecture

So, what does FastBar’s architecture look like under the hood? Glad you asked:

Client apps:

  • Registration: used to register attendees at an event, essentially connecting their credit card to a wristband and all of the associated features that are required at a live event

  • Point of Sale: used to sell stuff at events

These are both mobile apps built in Xamarin and running on iOS devices.

The server is more complicated from an architectural standpoint, and is divided into the following primary components:

  • getfastbar.com - the primary customer facing website. Built on Squarespace, this provide primarily marketing content for anyone wanting to learn about FastBar

  • app.getfastbar.com - our main web app which provides 4 key functions:

    • User section - as user, there are a few functions you can perform on FastBar, such as creating an account, adding a credit card, updating your user profile information and if you've got the permissions, creating events. This section is pretty basic

    • Attendee section - as an attendee, you can do things like pre-register for an event, view your tab, change your credit card, email yourself a receipt and adjust your tip. This is the section of the site that receives the most traffic

    • Event Control Center section - this is by far the largest section of the web app, it's where events can be fully managed: configuring details, connecting payment accounts, configuring taxes, setting up pre-registration, managing products and menus, viewing reports and downloading data and a whole lot more. This is where event organizers and FastBar staff spend the majority of their time

    • Admin section - various admin related features used by FastBar support staff. The bulk of management related to a specific event, they would do from the Event Control Center if acting on behalf of an event organizer

  • api.getfastbar.com - our API, primarily used by our own internal apps. We also open up various endpoints to some partners. We don’t make this broadly accessible publicly yet because it doesn't need to be. However, it’s something we may decide to open up more broadly in the future

The main web app and API share the same underlying core business logic, and are backed by a variety of other components, including:

  • WebJobs:

    • Bulk Message Processor - whenever we're sending a bulk message, like an email or SMS that is intended to go to many attendees, the Bulk Message Processor will be responsible for enumerating and queuing up the work. For example, if we were to send out a bulk SMS to 10,000 attendees of the event, whatever initiates this process (the web app or the API) will queue up a work item for the Bulk Message Processor that essentially says "I want to send a message to a whole bunch of people". The Bulk Message Processor will pick up the message and start enumerating 10,000 individual work items that it will queue up for processing by the Outbound SMS Processor, a downstream component. The Outbound SMS Processor will in turn pick up each work item and send out individual SMSs

    • Order Processor - whenever we ingest orders from the POS client via the API, we do the minimal amount of work possible so that we can respond quickly to the client. Essentially, we're doing some initial validation and persisting the order in the database, then queuing a work item so that the Order Processor can take care of the heavy lifting later, and requests from the client are not unnecessarily delayed. This component is very active during an event

    • Outbound Email Processor - responsible for sending an individual email, for example as the result of another component that queued up some work for it. We use Mailgun to send emails

    • Outbound Notification Processor - responsible from sending outbound push notifications. Under the covers this uses Azure Notification Hub

    • Outbound SMS Processor - responsible for sending individual SMS messages, for example a text message update to an attendee after they place an order. We send SMSs via Twilio

    • Sample Data Processor - when we need to create a sample event for demo or testing purposes, we send this work to the Sample Data Processor. This is essentially a job that a admin user may initiate from the web app, and since it could take a while, the web app will queue up a work item, then the Sample Data Processor picks it up and goes to work creating a whole bunch of test data in the background

    • Tab Authorization Processor - whenever we need to authorize someone's credit card that is connected to their tab, the Tab Authorization Processor takes care of it. For example, if attendees are pre-registering themselves for an event week before hand, we vault their credit card details securely, and only authorize their card via the Tab Authorization Processor 24 hours before the event starts

    • Tab Payment Processor - when it comes time execute payments against a tab, the Tab Payment Processor is responsible for doing the work

    • Tab Payment Sweeper - before we can process a tab's payment, that work needs to be queued. For example, after an event, all tabs get marked for processing. The Tab Payment Sweeper runs periodically, looking for any tabs that are marked for processing, and queues up work for the Tab Payment Processor. It's similar in concept to the Bulk Message Processor in that it's responsible for queuing up work items for another component

    • Tab Authorization Sweeper - just like the Tab Payment Sweeper, the Tab Authorization Sweeper looks for tabs that need to be authorized and queues up work for the Tab Authorization Processor

  • Functions

    • Client Logs Dispatcher - our client devices are responsible for pushing up their own zipped-up, JSON formatted log files to Azure Blob Storage. The Client Logs Dispatcher then takes the logs and dispatches them to our logging system, which is Log Analytics, part of Azure Monitor

    • Server Logs Dispatcher - similar in concept to the Client Logs Dispatcher, the Server Logs Dispatcher is responsible for taking server-side logs, which initially get placed into Azure Table Storage, and pushing them to Log Analytics so we have both client and server logs in the same place. This allows us to do end to end queries and analysis

    • Data Exporter - whenever a user requests an esport of data, we handle this via the Data Exporter. For large events, an export could take some time. We don’t want to tie up request threads or hammer the database, so we built the Data Exporter to take care of this in the background

    • Tab Recalculator - we maintain a tab for each attendee at an event, it's essentially the summary of all of their purchases they've made at the event. From time to time, changes happen that require us to recalculate some or all tabs for an event. For example, let's say the event organizer realized that beer was supposed to be $6, but was accidentally set for $7 and wanted to fix this going forward, and for all previous orders. This means we need to recalculate all tabs that have orders involving the affected products. For a large event there could be many thousands of tabs affected by this change, and since each tab has unique characteristics, including the rules around how totals should be calculated, this has to be done individually for each tab. The Tab Recalculator takes care of this work in the background

    • Tags Deduplicator - FastBar is a complicated distributed system that support offline operation of client devices like the Registration and POS apps. On the server side, we also process things in parallel in the background. Long story short, these two characteristics mean that sometimes data can get out of sync. The Tags Deduplicator helps put some things back in sync so eventually arrive at a consistent state

Azure Functions vs WebJobs

So, how come some things are implemented as Functions and some as WebJobs? Quite simply, the WebJobs were built before Azure Functions existed and/or before Azure Functions really became a thing.

Nowadays, it seems as though Azure Functions are the preferred technology to use so we made the decision a while ago to create any new background components using Functions, and, if any significant refactoring was required to a WebJob, we'll take the opportunity to move it over to a Function as well.

Over time, we plan on phasing out WebJobs in favor of Functions.

Communication Between the Web App / API and Background Components

This is almost exclusively done via Azure Storage Queues. The only exception is the Client Logs Dispatcher, which can also be triggered by a file showing up in Blob Storage.

Azure has a number of queuing solutions that could be used here. Storage queues is a simple solution that does what we need, so we use it.

Communication with 3rd Party Services

Wherever we can, we’ll push interaction with 3rd party services to background components. This way, if 3rd party services are running slowly or down completely for a period of time, we minimize impact on our system.

Blob and Table Storage

We utilize Blog storage in a couple of different ways:

  • Client apps upload their logs directly to blog storage for processing bys the Client Logs Dispatcher

  • Client apps have a feature that allows the user to create a bug report and attach local state. The bug is logged directly into our work item tracking system, Pivotal Tracker. We also package up the client side state and upload it to blob storage. This allows developers to re-create the state on a client device on their own device, or the simulator for debugging purposes

Table storage is used for the initial step in our server-side logging. We log to Table storage, and then push that data up to Log Analytics via the Server Logs Dispatcher.

Azure SQL

Even though there are a lot of different technologies to store data these days, we use Azure SQL for a few key reasons: it’s familiar, it works, it’s a good choice for a financial system like FastBar where data is relational and we require ACID semantics.

Conclusion

That’s a brief overview of FastBar’s technical architecture. In future posts, I’ll go over more of the why behind the architectural choices and the key benefits that it has.